Showing posts with label OUDF505. Show all posts

Monday, 12 May 2014

17: Animating


In the New Group, i was put in charge of completing the final 20 seconds of the animation, where the girl accidentally breaks a trick, attracting the Trolls attention to her presence. In the story the girl enters the Trolls Cave and, im assuming she is after the Large Glowing Gem that placed inside the tree (i say i assume because this fact is un clear, other then her looking at it). 

they was a small challenge on animating the Trolls and Girl in a small area, since the Troll has to appear around the Tree and look at her, problem, the Troll is wider then the tree and considerably bigger then the girl, another small problem i had to face was the Trolls size, die to it size it effected its over all movability around the tree, and what camera angles could be used since in the story bored most of the shots had both the Troll and The Girl in the same scene.

in the end the main problem i had was the short time space to fit a "action" scene, the original idea had the Troll attacking the Girl. and the Girl moves out of the way but the seconds part showed the girl take a step back, and the troll moving towards her as said, the size of Troll to the Smallness of the Girl effected the over all movement and pace..

the final result if found to be slightly rushed and improvised, improvement definitely needed

Friday, 9 May 2014

16: Troll Finals


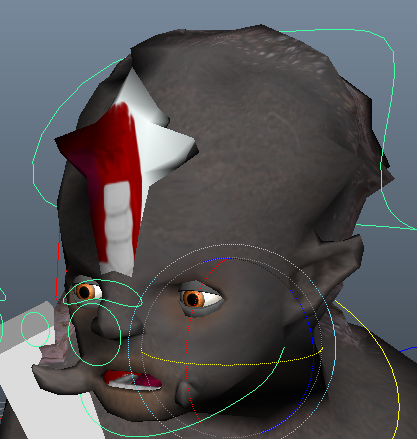
As said before, the trolls modelling was interesting, this is the first time i've modelled a Humanoid creature fully in Maya. and with such odd proportions.  like is said in the other post, the loin cloth was arrogating to place but simple to model.

i was debating with my self on how many faces the back rock and cloth should contain. give the rick more faces so the texture stretches less, but run a high rick of the "rock" looking too smooth. or leave them low polly, this would keep the rick jagged, even if/when smoothed up, BUT this would also mean they would be a lot of stretching in the textures and mesh

I later decided to go as low polly as physically possible but this did mean they would be some stretching of he was to move to much, but saying that. its a rock, how much movement will he be able to pull of?.. minimum really. in the end im happy with the result, saying that, it wouldn't have hurt too much to add a few extra polygons around the face and shoulder.

And again, here are the final results. his bag still passes though his body when he moves too much.


15: Grim Reaper Modelling


Once i Got the Designs Approved i spent the weekend modelling him.

The modelling was fairly simple in it own right. the only problem i found was making the hood. at 1st i modelled the head and neck separately to the hood and cloak. but this made for some off defamations when moving the head. so i decided to re do it and see if they was a way to connect the head to the hood and cloak.

i later decided that it would be better if the hood physically came out of the head, so where i re started from, the head, removing some of the faces from the skill and extruding round until, i had the head and Hood looking,,,some what ok. the body and arms were simple. no problems with modelling or rigging.


And here is the Final Result. i changed the "Cyan-Co" logo from Cyan To Crimson, so it would match a little better with Grim's Cloak.


13: Troll:Problems


As said I was given the role of Troll Modeller, Texture, rigger and animator and left in charge of the Trolls Development, any problems or mistakes were my problem to deal with.


Since The Trolls Concept and Turn-a-round was already made I started modelling, now with an agreement with my tutored I stayed away from Blender, and worked only in Maya. The Trolls design offered a challenge; the design shows the troll to have a rock lick growth on his back (back of the spine to the “hair line”. As well as a stone hand. Whitest going throw the processes and needed steps…
>modelling > UV un-mapping>texturing>rigging>binding and animating

I came across several problems,  (please note, I neglected to take screenshots of the following fixes)


Problem 1: Modelling (miner)
Problem here was working out how to model a loin cloth, since game characters can only be textured one side, I didn’t want the risk of having his cloth go invisible inside unity, so I needed to a way to double its thickness without making it stick out, or be a separate object

Solution: 
I extruded the ring of faces that were around the trolls belly and lower spine > I Deleted the unneeded faces so I was left with two pars. Then I started to extrude them downwards, moving vertexes around until I was happy with the end result> finally I extruded the now Loin Cloth model part, and same as before deleted any unneeded faces> then merged the vertexes to their original locations


Problem 2: UV map and Texturing

the problem here was my own fault, not an error or lapse of judgment. An old happened from Blender passed over (the thought that i could UV unwrap any time, even after rigging and binding) but i was wrong. 

the mistake i made was, i re mapped a part of the trolls face AFTER
 rigged and binding the Mesh, this meant that the new parts of the UV did not have any respected mesh to bind to, this lead to the textures of some areas (mainly the forehead rock) not staying.


Solution: only option I had was simple but annoying, and that is to unbind the rig/skeleton and re bind it, problem was solved and lesson learned, >Once bounded, do NOT touch or re map the UVs!"


Problem 2: Rigging
the problem here was small. and easy to fix. the Troll has a bag, this meant i needed to make a control bone for it (so the bag wouldn't deform with the leg/hips) this bone ended up not being used for animation. a 2nd bone we also needed for extra motion was for the Trolls belly, this bone kinda broke the rig. well detached the Root Bone From the Hip..

solution: 
the solution here was simply re arranging the Riggs Hierarchy and grouping. 

12: New Group.


Joining a new Group mid-way into the project was a bit risky, but the new groups roles are

Munny: Concept art Cave/environment > Modelling and Texturing Cave, Trees and rock
Sophie: Concept art Girl, Secrete Tree+Glow stone> Modelling and Texturing Glow Stone and Tree> Modelling, Texturing, Rigging and animating The Girl
me: Modelling, Texturing and Rigging the Troll >and animating The Troll and Girl+ any acceptance

(Former Member): Concept art: All, Texturing: All


So my Role was set, anything o do with the Trolls Modelling, Rigging and texturing was left to me. In addition to doing my own Texturing and Rigging, I assisted Munny on UV mapping the Cave, as well as assisting Sophie on fixing a misbehaving Rig for the girl.

11: Group 1 break down


Things were going Fine for the most part, but they were some concerns that has developed before the Crit and that was one of the team members (un-named) was un Reachable, with no way of knows if they had finished their part of the pe-planning or not, and on the day of the Crit we found our self’s one member short, and 1/3 of the work missing, . This was resolved later that day but not for log, things started to go downhill form that point till Easter communicants broke down, and attendance inside faded, this was looking bad.

Turns out another Group were having similar problems with one of their members, so last week before aster holidays, I was absent two team members, and they were absent one, it was discussed, decided and agreed apron that I would switch Groups 

10: Conept art:Guns


Like i said before it was time to start the concept art for the guns, since i didn't know how 'realistic" we wasted them to be, since we were going with a cartoony style. i started to make a set of hard sketches, each gun using small elements from the Research moodbored(s). i started by give each gun the same basic "skeleton" and trying to keep the designs simple. i then started to "Flesh" each gun out, trying to make them look different from each other but also keeping the basic "revolver shape".


In the end we narrowed it down to the top Right gun design, as it seemed more fitting for the story, character designs, setting and feel. some of the guns that were cut were too complex or un realistic to the point of looking stupid, they needed to be modelled  and textured after all.. they was another factor on this conclusion, Some of the guns chambers did not level up with he guns barrel. next step take the basic block Sketch and and more details, then model the gun(s)


09: Reasurch:Guns


Guns, well, since we were going for Weston, that would be the staring point.  We all started to look at our respected areas, , as said before i was looking into guns, so I started by looking at versus collections, times settings and designs of old Weston type guns, (mainly Revolvers and Peacemaker designs) gradually looking towards modern day designs.


2nd set was to look into Steam punk type guns (to help spark ideas fir Grims Demonic “Chaos Makers”. Steam Punk is and interesting item to look at, people take old Plastic toys Such as a Nurff Gun, and with some gold, silver and bronze paint, and air brushing for a Dirt effect+ extra modifications like pipes and gears. Really makes a cheap looking toy amazing


After looking at Steam Punk, I started to look into pre Existing Fantasy guns, like Vincent valentines Final Fantasy) revolver, or Scorpios (Just Cause 2) Signature gun, or even Hell Boys five Fingered Mary. 

now with some ideas floating around it was time to begin on the concept art


08: research 2

Guns,,

guns, well, since we were going for Weston, that’s the place to start,  we all started to look at our respected areas, , has said for me it was guns, so I started by looking at versus collections, times and designs of old Weston type guns, (mainly Revolvers) gradually looking towards modern day designs.


2nd set was to look into Steam punk type guns (to help spark ideas fir Grims Demonic “Chaos Makers”. Steam Punk is and interesting item to look at, people take old Plastic toys Such as a Nurff Gun, and with some gold, silver and bronze paint, and air brushing for a Dirt effect+ extra modifications like pipes and gears. Really makes a cheap looking toy amazing.


After looking at Steam Punk, I started to look into pre Existing Fantasy guns, like Vincent valentines Final Fantasy) revolver, or Scorpios (Just Cause 2) Signature gun, or even Hell Boys 5 Fingered Mary.
I started to make quick Gun Sketches, thee guns on each page, with each page going into a level of “oddless”


1: real, 2: Game, 3: Steam punk, 4: Tech

07: Alien


For a studio task we were given a pre made T-pose and were instructed to use the image to help us model an alien bipod. later to be rigged and animated for use in unity.

Following Mats Video Tutorials on modelling a biped alien, i produced this. seeing that this was my first time really modelling a character in maya and not in, other programs,,, the process was almost the same  with a few differences.

Saying this, old habits die hard. and i was still using the odd shot-cut from the other program, witch in maya has a completely different effect.
i didn't really come across any problems with the rigging, since it was fairly simple. annoying, but simple.


Once i finished Modelling the alien we were given, i got a bit bored and started to mess around with Materials and Extruding. until i ended up with this guy. a green/grey alien with a nice space suit and armour. and an additional finger.

But since this guy was not a part of the tutorial. he was left this way, un rigged and un animated.


next up was UV mapping and texturing, AH, UV texturing, the process sounds simple on paper, but actuarially getting into un mapping was a pain, all it takes is one missed place click>cut uv, and you mess up the UVs,, badly.

at the start it was rather annoying with the cutting, and pinning, unfolding and moving, but after a while i got use to this way of un mapping and it became much simpler.


Rigging, Well following mats Tutorials did help. but at times they were confusing, i needed to re visit them multiple times. the rigging process was simple, its a matter of placing bones in the right places. and settings the right constrains.

how ever. the control parenting was annoying, i "broke" the rig multiple times until i finally got it working. in the end i was able to achieve all the needed skills the tutorial videos pointed out, everything but one, the followed art roll no matter how many times i tried. the role didn't apply, and if it did i was barely visible


06: Group(1) Role


With the Idea(s) set, we set about giving/agreeing to Roles, and they are as follows

Finn: Concept art for the Environment> Modelling Buildings and terrain>Texturing Buildings and terrain>??>??
Sara: Concept art for the Characters > Modelling Buildings, and props> Texturing characters > Assisting Rigging and binding>??
me: Concept art for the Guns and Props> Modelling Characters (X2 >cowboys, Grim, weapons)> Texturing Weapons and props>Rigging and binding> Animating.


With our roles now set, it’s time to do more researchers and begin on concept work.