Showing posts with label OUDF603. Show all posts

Sunday, 10 May 2015

32 of 32: Play blasts


Since I was unable to finish to animation in time and with only 40% (if that) being animated,
I had to fall back on some High res Tests,here are a few play blasts to demonstrate what it should be like without waiting hours for it to render+editing. In addition they are a few Renders of ‘key’ pints to demonstrate what it should look like...


Also they is no sound with this video as the nature of the editing, (inserting still renders) it would put the audio out of sink,,,,that or have a odd drop in audio,,, so i apologize for the silent viewing


Here we see a child happy reading a book, the idea is they will be rain outside of the window
The books image serves as a transition between the Girls world and the would inside the book
the story follow a girl in red trying to get back to the path. when a wight wolf backs out of the trees into her, making her fall


this is near the end, as the Girl looks inwards, a beast is looking at her, in a revers shot, the beast is seen lurking out of the shadows and moving towards her!

Clash of thunder wakes the girl from her dream, with a shock and surprise  she realizes the storm outside and sits to watch it.


this is the final shot, and the credits follow soon after. the books title is also the animations title. this is also the same book i intend the Girl in Red to be carrying (instead of a basket of food)

31 of 32: TurnTables


Just a small Turn table show reel to show off the characters in a ‘Basic’ pose. As well as to demonstrate the characters’ size in relation to each other. I had intended on making more turntables with the character’s being animated but I simply ran out of time to do that…


In addition I made a secondary turn table that showered the Wireframe of Mika. As well as a small demonstration of the Dynamic Joint chain.


Saturday, 9 May 2015

30 of 32:, Dynamic Joints VS cloth simulation A


Following CoP3 where I rigged the hair to be driven by IK chines, allowing me to move a controller and the hair stand would move with it. But for this project I wanted to try and apply some dynamics to the hair so it would move on its own freedom. Dynamic chains are interesting to work with, but they are some what un predictable, mainly they have a slight issues with colliders, the Joints will move away from said collider object, however the mesh that is bounded to the joins kind of pass through the colliders… a nether problem I had was that the Dynamic join chains just wanted to fall straight down since they were effected by gravity, this is good in its own right, but not helpful if/when you want the object to by dynamic, but still maintain its original shape. So I spend quite a bit messing with the setting to find how I could maintain the shape and keep the join dynamic.


with the Dynamic Join chains set up, the dynamics are ready to go, and depending on what the dynamics are driving, say a link of chains, a piece of rope, cloth or hair will depend on the setting you use, for example.


Here we have Little Reds hair using the Defout valuse givem when you make the dynamcs, now they are loads of settings you can use to change how the dynamics behave, but for now its defoult. and when you press "interactive playback", the dynamics start working,,, but they fall stight down, as if the hair has no shape to it..(or is it volume,,?).. since Her hair is made to "hug" her head,, that is parted to aside, and follwos her head/neckline i needed to change some setting,


If you change the “Start Curve Attract” to .3 and “Attraction Damp” to .5 I found that this kepped the objects original shape. yet allowing it to move freely. perfect or cartoony/anime type hair, and clothing items,,, like maybe scarfs and cloaks.


Join Dynamics seared to be the right cause of action, but they was a problem, Join Dynamics worked fine for hair and it works slightly ok for Little Red’s Cloak, but as said before with the mesh passing though other objects, this made the shirt tricky. Since it would keep passing though her legs… so for this I had to use a cloth simulation...annoyingly I must have wasted a few hours trying to get it to work, just to realize it only needed a few clicks, and pin constraints.

29 of 32:, Joint Dynamics, Skin binding vs Cloth sim


Follow up on the last blog, some extra notes and a review kinda on each methods when making cloth, you have a number of choices on how to rig and animate them, you can use a cloth simulation, mess with its settings until you get what you like, you could use IK driven joints, and have controls thought the joint chain to give full control. or you could simple straight up Skin bind the object to bones (works best for Hoods, cleaves. and short items)


1, here we have the simplest of method, straight up Skin bind...

simply put the skirt is bounded to the L_Leg, R_Leg and Hip_Dislocate joints, And applying 2 levels of smooth weight via weight paint Tool.


Pros, the skirt Deforms with the legs movements as expected, and needs no attention. and minimum stretching, render time+playback is normal

Cons, its solid and lifeless, and if you move too much some of the mesh might pock though the top,, or fall through objects (ie if you have them sit)


2, here we are using the Cloth simulate and a collision bound on the body, the set up is fairly simple,

Under nDynamic tool set.1st select object> nMesh> Create Cloth, 2nd select the cloth object, go into Vertex mode and select the area you want to pin. then SHIFT select the target object, go to nConstraints> Pin to suffice

Pros, you have loads of presets and controls to make the fabric look 'Right',
the nCloth DOESN'T pass though other object (if they have collision bounds added)

Cons, you can view an animation in real time, so when animating, best you turn the nucleus off or make switches.
the cloth can at times bunch up and look jagged.


3, and finally here we are using the Dynamic Joints we looked at in the last blog,,


Simple crate a joins that follow the target objects rename joints as Root>Start>1,2,3..end.
Create a CV curve on each joint between Start and End,
Select the CV Curve and make it nHair (hid the original CV curve)
With IK spline tool selected, select the Start joint, End joint and the new CV curve
in the joint chain replace the new CV curve with the Original CV curve....

with the right settings, it looks fairly ok,


Pros, you can view it in real time in the view port,
render time is fairly ok but slightly slow
Dynamic curves can be used for both small or large objects,

Cons, you have no control on how it reacts (unless you make secondary animation controls)
the dynamic joint have a habit of passing though other objects (even if they have collision bounds added to them)


Conclusion: Dynamic join chains are best used with hair, cloth strands, ie rope, cables, curtains, cloak, or (the long floppy bits on long coats)
Dynamic joint chains are not so good with Skirts or dresses... anything that needs to overlap  an object that moves.

i am tore between using either Skin bounded skirt, or nCloth Skirt, as both effects are desert, but i really want to get the dynamic joint chains to work with the skirt, as i do like its look and effect..


28 of 32: making Dynamic Joints

how i make JointChains
(with help from tutors)


1st, create the joints you need, or model i found making 4-6 joints. named as Root>Start>01>02>03>End and i would Aline each joint with a veracity of equal distance(this is helpful if you want the Dynamic joint chain to maintain some of the Meshes shape, rather then flop freely)


2nd, i would make a CV curve srarting from the 'Start' joint to the 'End' Joint, NOT from the Root joint, as this joint will be parented to another joint, Example..,

-if its hair your making, the 'hair Root' would be parented to the 'Head Tip/End'.
-if its a skirt,  then the 'Skirt Root' joints would be parented to the 'Hip Dislocate' joint, or even to the Leg joint itself
-If its a Cape then the 'Cape Root' Would be parented to the Spine (below the neck joint). and to the Clavicle. by doing this some of the capes Dynamic chain will follow the arm.
and Rename the new Curve to [Item name] original Curve' as this will come in handy later.

(Note1: you can either parent the Dynamic 'Root' joint directly to the Head joint, Head end joint, or (Depending on the the nature of the dynamic joints) you can make a new joint named "Nest" parent  the Root joints to it, then parent the 'Nest' to the head.)


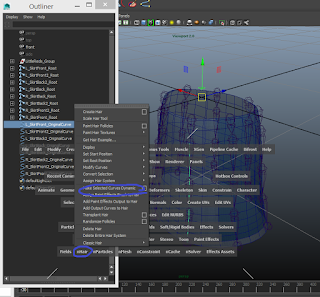
3rd, after making all the CV curve needed and renamed them, the next steps is to press 'space' to bring up the tool menu (dunno its name...) and under 'nHair' select 'make selected Curve Dynamic'  if done correctly these should have been created
'HairSystome' 
'HairSystomeFolicals' Group > 'Follicle1' > 'Name_OriginalCurve'
'hairStstomeOutputCurve' > 'Curve1'
-you will want to rename the 'Curve1' to a matching name as 'name_OriginalCurve' but replace Original with Dynamic (or whatever you like its just so you can find it later)
-it would also be a good idea to add the relevant joints name in-front of 'hearSystome' and 'Follicle1' and group hairSystome, Follicle, and outPutCurve together. Rename the Group as the joints main Name_Group
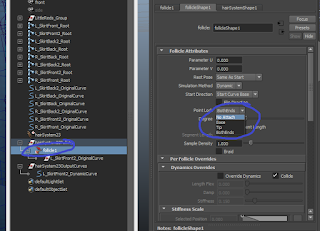
-also if you click on the 'Follicle1' and open the attribute editor, under [Name]_FollicleShape' > 'Follicle Attributes' change the 'Point Lock' from 'BothEnds' to 'Base' this makes the Dynamic Joint chain/curve flow from freely the 'Start joint' rather then wobble between the 'Root and End' joints.. finally, select the Original Curves' and under 'View' turn it off, as we don't need them yet'


Repeat this process for all the other CV curve then  Group all the Groups into one name it [name] DynamicGroup (Pic)

4th, after renaming everything and grouping them all into a nice layout,  and everything set, the next thing you will need is to set up the IK spline Handle Joints. to do this go into Animation window> Skeleton> IK Spline handle tool, and press the little box to open the settings, Reset the settings and turn OFF 'Auto create Curve' since we already went thought to trouble to make our own curve.

-with the IK Spline Handle selected, select the 1st joint (this should be [Name]_Start and NOT [Name]_Root, > Shift Select the End/Tip joint and Finally Shift Select the DynamicCurve. if done correctly a IK spline handle shoudl have been made with a 'ikHandle1' inside the out liner, rename this to its matching name with _DynamicSpline at the end (or what ever you want to call it) and place it inside the matching Group

If done correctly you should be left with something like this... a mess of names and groups,,


5th, there is one more step needed, when we created the IK spline Handle, the 'DynamicCurve' was parented/nested with the Respective joint, we need to take the 'DunamicCurve' out and place it back into the 'hairSystomeOutPutCurves' goup. and place the 'Original Curve' in its place
(drag and drip Original curve ONTO the [Name]_Root joint this should place the OriginalCurve under the [Name]_Start joint


(note: you dont need to just place the OriginalCurve with the joint, you can also move the Follicle group too
(Note2: according to some Tutorials, if you make the dynamic curves WITHOUT the "root" bone,, then you can Parent the Dynamic Curve to a controller, the effect is more or less the same)


Final step. Bind the mesh to the Rig, and i found going over each bone in the whight paint tool. setting it to "smooth" and hit flood once,, this just smooths out its effected paints and overlaps some bones connections. leaving for a more smoother effect

(Note2: it is IMPORTENT that you leave ONE joint free from the Dynamic Joint chain (IE the Root) do NOT start the Dynamic Curve from the Root, or Parent the 'start' joint to another Joint. if you do thsi then the nsolver will have unwanted effects and may cause you to start over...(image)

(note3) when applying a passive collider to a mesh avoid appling the colider to a Dynamicaly Driven mesh, idont know why but doing this kinda makes the joints Explode in a simmiler way as wrongly parenting the rootjoint)


27 of 32: Things to do 2.0

here is an update on my checklist i made some time ago, X=done __=undone

[__]Production schedule
[X]Story
[X]Shot list
[X]Story bored
[X]Animatic

the biggest problem i have is making a production schedule, at 1st i forgot to make one,but as time passed, I didn't see the point in making one, or "faking" one just so I had one, since it would be obvious I didn't stay to it, and that's the reason I don't have one, because I know I would't be able to stick to it, that and it would confuse me...


====
[X]Consept dev
[X]Mika (Real Wold)
[X]Bedroom (Pre model
[X]Mika (Red riding hood)
[X]Grey Wolf
[X]Shadowy beast
[X]Woods/forest
[X] Butterflies & flowers
[X] The Path
[X] Granny House

as bad as sixths is, I tend to go with the 1st idea i made,,, so it was kinda annoying making variations of somthgin just to try different things... but at the start of Mikas/ Reds Development, she was gonna have the same promotions and build as the CoP3 version,, but thought drawing the cloths using a diff rent body style, i decided to make her less carttony and a little more correct...
====
[X]Modelling
[X] Mika
[X]Red Riding  (normal)
[X]Red Riding  (cuts and tattered cloak)
[X] Grey Wolf (Normal)
[X] Black/ Shadow Wolf
[X] Texturing
[X] Rigging
[X] Blend shapes for Mika and Red Riding
[X] Basic Blend shapes for Wolf and shadow beast
[__] Animate
[__] Render

the modeling and drawing (backgrounds) profess took longer then expected, mainly due to errors, and a miss behaving program that kepped crashing before i saved... the problems in question was the dynamic joint chains, though a pain to set up, and a hassle to get working. i do intend to use them in future.

time ran short, shorted then i had realized, and with some assets still not working as then should (corrupted image files..) the animation process was delayed and so too was the rendering. witch also had to be changed since i ws using Maya Softwere to render, but now im using Mental Ray...

====
[__] After Effects
[__] Back plates (Woods)
[__] Set extension (Woods)
[__] Compositing

this segment has now been by passed since i created a virtual set inside mayo using flat images with alpha channels, menacing i wont need to use Aftereffects the background, but i may/will still use i for set extensions and sequencing...

====
[__]Editing
[__] Add sounds effects, Music (if/where needed) and ambient audio

[__]Finalize

Needless to say without a finished product renderd, editing and sound effects were pointless beond simple placeholder sounds....

Thursday, 7 May 2015

26 of 32: Random Tests


 with the idea of using Dynamic Joints for hair and clothing, I needed to test it on something, so I used a model asset I made in my own time (and intended on using it in the animation) and make its hair and tail driven by a dynamic chain, 1st test was a simple “bob and weave’ kind of motion to see how the joints flowered. The 2nd test I made the character dance to “nyan’ this was to see what effect would fast motions have on the joints, result Bad. The joints would try to re correct them self’s and end up pinging off in the different direction


Shading and lights. Another test was as pointed out shadows and lights. The start and end areas of the story take place in the “real world’ at night. Meaning I needed to manipulate the lighting to make it appear its dark and a lamp/light were being used. I wanted to create a kind of dark yet cozy reading environment followed by a dark stormy feel…


(Note See: File: R&D> Test> Pinkimena 01&02)