(with help from tutors)

1st, create the joints you need, or model i found making 4-6 joints. named as Root>Start>01>02>03>End and i would Aline each joint with a veracity of equal distance(this is helpful if you want the Dynamic joint chain to maintain some of the Meshes shape, rather then flop freely)
2nd, i would make a CV curve srarting from the 'Start' joint to the 'End' Joint, NOT from the Root joint, as this joint will be parented to another joint, Example..,
-if its hair your making, the 'hair Root' would be parented to the 'Head Tip/End'.
-if its a skirt, then the 'Skirt Root' joints would be parented to the 'Hip Dislocate' joint, or even to the Leg joint itself
-If its a Cape then the 'Cape Root' Would be parented to the Spine (below the neck joint). and to the Clavicle. by doing this some of the capes Dynamic chain will follow the arm.
and Rename the new Curve to [Item name] original Curve' as this will come in handy later.
(Note1: you can either parent the Dynamic 'Root' joint directly to the Head joint, Head end joint, or (Depending on the the nature of the dynamic joints) you can make a new joint named "Nest" parent the Root joints to it, then parent the 'Nest' to the head.)

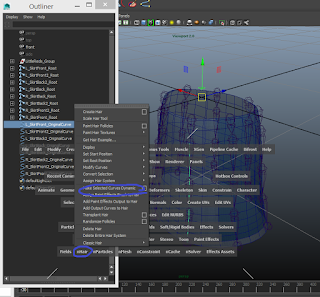
3rd, after making all the CV curve needed and renamed them, the next steps is to press 'space' to bring up the tool menu (dunno its name...) and under 'nHair' select 'make selected Curve Dynamic' if done correctly these should have been created
'HairSystome'
'HairSystomeFolicals' Group > 'Follicle1' > 'Name_OriginalCurve'
'hairStstomeOutputCurve' > 'Curve1'
-you will want to rename the 'Curve1' to a matching name as 'name_OriginalCurve' but replace Original with Dynamic (or whatever you like its just so you can find it later)
 -it would also be a good idea to add the relevant joints name in-front of 'hearSystome' and 'Follicle1' and group hairSystome, Follicle, and outPutCurve together. Rename the Group as the joints main Name_Group
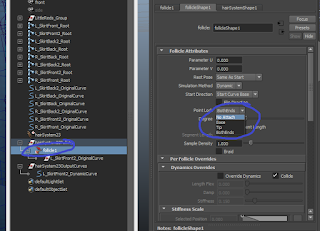
-also if you click on the 'Follicle1' and open the attribute editor, under [Name]_FollicleShape' > 'Follicle Attributes' change the 'Point Lock' from 'BothEnds' to 'Base' this makes the Dynamic Joint chain/curve flow from freely the 'Start joint' rather then wobble between the 'Root and End' joints.. finally, select the Original Curves' and under 'View' turn it off, as we don't need them yet'

Repeat this process for all the other CV curve then Group all the Groups into one name it [name] DynamicGroup (Pic)
4th, after renaming everything and grouping them all into a nice layout, and everything set, the next thing you will need is to set up the IK spline Handle Joints. to do this go into Animation window> Skeleton> IK Spline handle tool, and press the little box to open the settings, Reset the settings and turn OFF 'Auto create Curve' since we already went thought to trouble to make our own curve.

-with the IK Spline Handle selected, select the 1st joint (this should be [Name]_Start and NOT [Name]_Root, > Shift Select the End/Tip joint and Finally Shift Select the DynamicCurve. if done correctly a IK spline handle shoudl have been made with a 'ikHandle1' inside the out liner, rename this to its matching name with _DynamicSpline at the end (or what ever you want to call it) and place it inside the matching Group
If done correctly you should be left with something like this... a mess of names and groups,,

5th, there is one more step needed, when we created the IK spline Handle, the 'DynamicCurve' was parented/nested with the Respective joint, we need to take the 'DunamicCurve' out and place it back into the 'hairSystomeOutPutCurves' goup. and place the 'Original Curve' in its place
(drag and drip Original curve ONTO the [Name]_Root joint this should place the OriginalCurve under the [Name]_Start joint
(note: you dont need to just place the OriginalCurve with the joint, you can also move the Follicle group too
(Note2: according to some Tutorials, if you make the dynamic curves WITHOUT the "root" bone,, then you can Parent the Dynamic Curve to a controller, the effect is more or less the same)
 Final step. Bind the mesh to the Rig, and i found going over each bone in the whight paint tool. setting it to "smooth" and hit flood once,, this just smooths out its effected paints and overlaps some bones connections. leaving for a more smoother effect
(Note2: it is IMPORTENT that you leave ONE joint free from the Dynamic Joint chain (IE the Root) do NOT start the Dynamic Curve from the Root, or Parent the 'start' joint to another Joint. if you do thsi then the nsolver will have unwanted effects and may cause you to start over...(image)
(note3) when applying a passive collider to a mesh avoid appling the colider to a Dynamicaly Driven mesh, idont know why but doing this kinda makes the joints Explode in a simmiler way as wrongly parenting the rootjoint)

No comments:
Post a Comment